Assessing the impact of shading on system performance is an essential step in solar design. Especially in the residential market, solar designers often deal with shading issues like trees, chimneys, and other obstructions.
The question designers often face then is: given these conditions, how do I maximize system performance?
This is not an easy question to answer because shading can affect performance in a nonlinear way. However, an optimal solution can be found by following four steps.
1. Quantify. What’s the best way to quantify the impact of shading?
Solar Access measurements are useful as a guide but have limitations because they do not account for system configuration. Thankfully, modern, module-level simulation engines can accurately model the impact of shading on performance. (Simulation engines that model system performance at a submodule level offer even more accurate estimates of energy production when modules are partially shaded.)
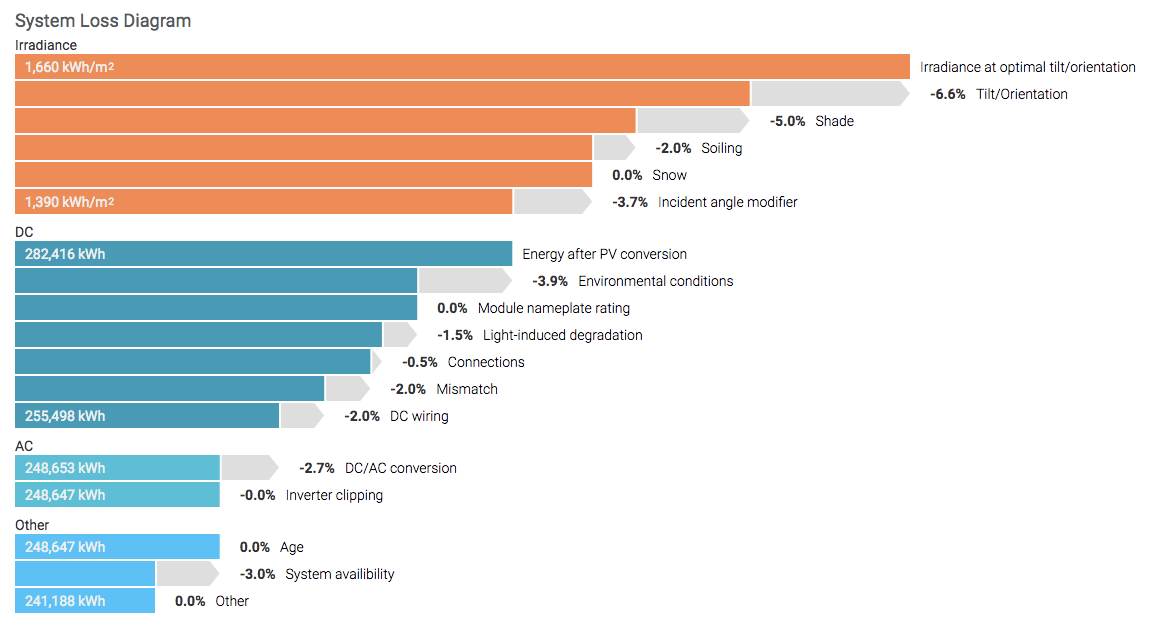 Aurora’s performance simulation feature quantifies energy losses from shade and other sources.
2. Explore. Systems come in countless combinations of size, location, and configuration. Designers have several options to mitigate shading losses:
- When using string inverters, string the modules in a manner that minimizes shading losses. In some cases, simply changing the stringing configuration of a system can result in energy boosts of over 10%.
- Use module-level power electronics (microinverters or DC optimizers). In addition to mitigating the impact of shading by performing maximum power point tracking (MPPT) on a module-by-module basis, they eliminate module mismatch losses (which occur when one shaded module causes the current through an entire string of modules to drop).
- Use modules with integrated cell string-level power electronics. These replace the bypass diodes inside modules with DC optimizers that perform MPPT at the cell string-level.
- Increase the DC-to-AC ratio to reduce balance of system costs (the costs of all components of a PV system other than the PV panels, such as wiring, racking, and inverters). Shading results in lower DC power, thus more panels can fit on an inverter without causing significant clipping.
- Explore the use of higher efficiency modules or modules with a higher open-circuit voltage (or Voc — the maximum voltage available from a solar module). A higher power density allows you to make better use of low-shade areas, whereas shorter strings are impacted less by shading.
- Vary the location and size of the system. Energy produced at different times of the day can have different values to the client.
3. Assess. Cost-benefit analysis ultimately leads to the “optimal” system design. But value is not always easy to determine. With Time of Use and tiered rates, the compensation for each kWh produced by the system can vary greatly. It can sometimes be better to place a system where there is more shade overall, but the system remains unshaded during high-value times. A detailed financial model that can handle these nuances is essential.
 An example of a Time of Use rate, with higher energy prices at times of higher energy demand.
4. Automate. A detailed site assessment takes time. Without the ability to quickly assess a variety of design variants, how many iterations can you afford to do? And how do you know if your design is really the optimal solution? Putting a streamlined process in place is crucial.
We believe software can empower solar designers to make these critical design decisions in an efficient manner. That is why we built Aurora to streamline the design process from remote shade measurements and module-level performance simulations, pricing and detailed financial analysis, all the way to proposal generation — and Aurora’s AutoDesigner even generates an optimal system design for you at the click of a button.